Implementing Role-Based Access Control (RBAC) in Azure for Enhanced Resource Management Security
Implementing Role-Based Access Control (RBAC) in Azure for Enhanced Resource Management Security

Meta Description: Learn how to implement Role-Based Access Control (RBAC) in Azure to secure your resource management. This guide provides a step-by-step walkthrough, best practices, and advanced troubleshooting tips for IT professionals.
Introduction
In today's cloud-centric world, securing resource management is a top priority for any organization. Azure provides a robust mechanism called Role-Based Access Control (RBAC) that allows you to manage who has access to Azure resources, what they can do with those resources, and what areas they have access to. As a Senior Cloud Architect, I have seen firsthand how a well-implemented RBAC strategy can significantly enhance an organization's security posture. This blog post will provide a deep dive into implementing RBAC in Azure, including a step-by-step configuration walkthrough, advanced troubleshooting, and best practices for enterprise settings.
Technical Architecture Overview
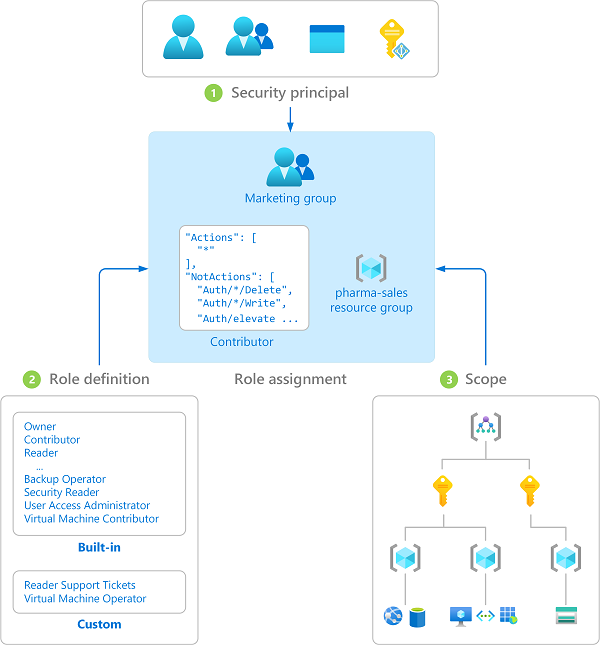
RBAC in Azure is a system that provides fine-grained access management for Azure resources. It allows you to define roles that specify a set of permissions and assign these roles to users, groups, or service principals at a specific scope (subscription, resource group, or resource level). The main components of RBAC are:
Role Definitions: A collection of permissions that can be assigned to users, groups, or service principals. Azure provides built-in roles such as "Owner," "Contributor," and "Reader," but you can also create custom roles.
Role Assignments: The process of attaching a role definition to a user, group, or service principal at a particular scope.
Scope: The set of resources that the access applies to. Scopes can be a management group, subscription, resource group, or a single resource.
To visualize, a typical RBAC architecture might look like this:
Configuration Walkthrough
Let's walk through the process of implementing RBAC in Azure. This walkthrough will cover creating a custom role, assigning a built-in role, and verifying the role assignment.
Step 1: Access the Azure Portal
Log in to the Azure Portal with your credentials.
Step 2: Navigate to the "Access control (IAM)" Section
Select a resource group or a specific resource where you want to manage access. Click on "Access control (IAM)" in the left-hand menu.
Step 3: Assign a Built-in Role
Click on the "Role assignments" tab and then click on the "+ Add" button. Select "Add role assignment."
- In the "Role" dropdown, select a built-in role such as "Contributor" or "Reader."
- In the "Assign access to" dropdown, select "User, group, or service principal."
- In the "Select" field, search for the user, group, or service principal you want to assign the role to.
- Click "Save" to complete the role assignment.
Step 4: Create a Custom Role
If the built-in roles do not meet your needs, you can create a custom role. To do this, navigate to the subscription where you want to create the custom role.
- Go to the "Access control (IAM)" section of the subscription.
- Click on "Roles" and then click on the "+ Add" button to create a new custom role.
- Provide a name and description for the custom role.
- Define the permissions for the role. You can start from scratch or clone an existing role and modify it.
- Specify the assignable scopes where this role can be assigned (e.g., subscription, resource group, or resource).
- Review and create the custom role.
Step 5: Verify Role Assignments
To verify that the role assignments are correctly applied, you can check the "Access control (IAM)" section of the resource group or resource where the role was assigned. The "Role assignments" tab should list all the role assignments for that scope.
Troubleshooting & Monitoring
Even with a well-planned RBAC implementation, issues can arise. Here are some common troubleshooting steps and monitoring practices:
Check Activity Logs: The Azure Activity Log provides a history of all actions taken on your Azure resources. If a user is unable to perform an action, check the Activity Log for any denied actions and verify the role assignments.
Use Azure Policy: Azure Policy can help enforce organizational standards and assess compliance at scale. You can create policies that require specific RBAC roles for certain resources.
Audit Role Assignments: Regularly audit your role assignments to ensure that only the necessary permissions are granted. Use the "Access control (IAM)" section to review and remove any unnecessary role assignments.
Diagnose Access Issues: The "Check access" feature in the "Access control (IAM)" section allows you to check a user's access level for a specific resource. This can help diagnose why a user might be unable to perform a certain action.
Enterprise Best Practices 🚀
Based on my experience, here are some best practices for implementing RBAC in an enterprise environment:
Security-First Design: Always follow the principle of least privilege. Only grant the permissions that are absolutely necessary for a user to perform their job functions.
Role-Based Access Control (RBAC): Use built-in roles whenever possible. Only create custom roles when the built-in roles do not meet your specific needs.
Automated Backups and Disaster Recovery: Regularly back up your RBAC configurations and role definitions. This ensures that you can quickly restore your access control settings in case of accidental deletions or changes.
Regular Audits and Reviews: Conduct regular audits of your role assignments and permissions. Remove any outdated or unnecessary role assignments to minimize security risks.
Use Azure AD Groups for Role Assignments: Instead of assigning roles to individual users, assign roles to Azure AD groups. This makes it easier to manage access for multiple users and ensures that role assignments are consistent across the organization.
Conclusion
Implementing Role-Based Access Control (RBAC) in Azure is a critical step in securing your resource management. By following the steps outlined in this blog post, you can ensure that your organization's Azure resources are well-protected and that access is granted based on the principle of least privilege. Regular audits, a security-first design, and leveraging built-in roles whenever possible are key to maintaining a robust security posture. As a Senior Cloud Architect, I highly recommend making RBAC a cornerstone of your Azure security strategy.
By following this guide, you should be well on your way to implementing a secure and efficient RBAC system in Azure. If you need further assistance or have any questions, feel free to reach out to our team of experts who are always ready to help you navigate the complexities of Azure resource management security.


Comments
Post a Comment